Pages

Wednesday, March 25, 2015

Tile

You watched, you waited, you got instagram sneak peaks, and now I present: the kitchen. 
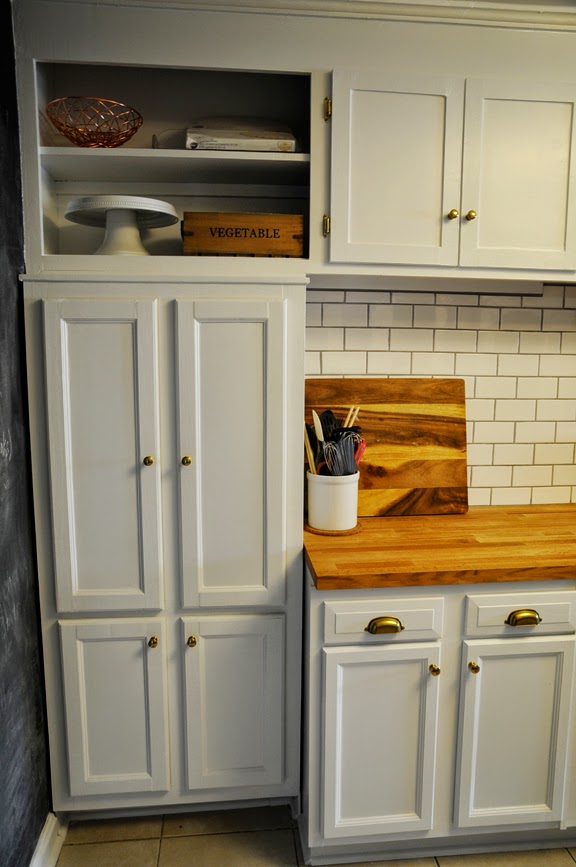

What's up tile!?!


I'm obsessed with this pretty faucet and so glad we kept the original cast iron sink.


I took this little shot to give ya'll an idea of all the colors and how they play off each other.  I do need to touch up the paint on some of the cabinets after this. Tiling was by far the roughest we have been on the paint and marble.


So looking the other way, with a strategically placed corgi dog.


I guess I could have styled the side of the fridge up a little more. But who cares when the kitchen is so pretty.


I'm somewhat at a loss for words and truly can't believe it turned out as well as it did. We had my Dad over for dinner and Chefhusband whipped up something incredibly delicious.  Ernie is also thrilled with the results.


I also commissioned Flower Shop Charleston which is just around the corner to make a new garland for over the door and Lily did such a good job! She has an entire wall of dried flower crowns and I wanted to take them all home. If I could wear a flower crown everyday,  I would.

Next up, the porch!
Betsy

Tuesday, February 10, 2015

So I *helped* Design a Bridal Shop

Sorry I dropped of planet earth. BBJ {my place of business} just moved from North Charleston to West Ashley and I've been busting my chops getting the new shop designed and set up. But it happened! And the new shop is really pretty!

I'm going to spare you the long back story and just jump into the pretty design details. 

Here is the before photo of the new space:


What a looker right? Luckily I was there when they pushed through that drop ceiling to discover shiplap. They considered refinishing it, I voted to keep it open and exposed!


And another veiw looking straight back from the front door. Isn't that mismatched flooring the best? The funny thing is that the first year I ever lived in Charleston I bought a rocking chair from the thrift store that used to occupy the space. I couldn't fit it in in my car at the time and had to have a friend come pick it up for me. Funnier, we used to talk about how West Ashley would be a great spot for a bridal shop. Circle of life right? 


So the owner of the shop are generally wonderful people, but designing a bridal shop was not really their thing, which is super lucky for me. I was allll over it and had a blast picking out some of the details.  True to form I made an inspiration board to help me stay focused. I've been obsessed with the BM paint color "touch of grey" and knew we had to go with white ish flooring to counterbalance the dark ceilings. This is not a restaurant so it needed to maintain a feeling of lightness even with a darker ceiling. 


And here is how it ended up. In my secret heart I wish we didn't have bridesmaid racks, but more so because they ruin the aesthetic just a touch. Overall, I'm really really happy and proud of the space! 


The wall color ended up being a Sherwin William's color called Destiny that I love. Its a grey that leans towards mauve. The flooring is engineered, but I can't tell you how many times I've already had people ask if it is really hardwood.  Also that IKEA light? Yes.  I made the "bling ladder" to display all our pretty sashes and to pull some of the wood tones down from the ceiling.

MLW and I also ripped some nasty green carpet off the smaller stage towards the left and I sanded and stained it.


View looking towards the shop from the front door. In a perfect world their would be no computer cords, but alas.


Finally I sourced some metal tub chairs and two love seats from Target . A few cute throw pillows from Marshall's and a seagrass rug to define the space and done. Cue the wedding gowns! At first no one got the metal tub chairs, but I've had a kid pee {yes thats right, pee} in a chair at the old store. My hopes were to get as much furniture that is kid proof as possible. That chair ended up in the garbage, these would just need an intense session with bleach. 

* Side note, the kid that peed in the chair is not to be confused with the kid that peed on the floor and as I was cleaning it up ripped my pencil skirt from seam to seam. Remind me to tell ya'll more about that later.* 

All of the after store photos are taken by Amore Photography and Design and they are fabulous. Quick, efficient, funny and super talented. We had a blast with them, if you need a photographer in the Charleston area  you should definitely consider them! 

Okay that is all for now! I visited with a friend around the corner and she is in a renovation overhaul at her place and it has definitely got my wheels spinning for 5054! 

~B 

Tuesday, January 6, 2015

Dining Room Reveal

Remember when I made this inspiration board a few months ago? Well, the dining room is about 95% complete and I'm ready to reveal!
I'm not sure I will ever dub it 100% because accessories and art are sure to change over time, but for the most part she is done.


Including the winner of the Dining Room Light Challenge! Thank ya'll again for your thoughts and opinions, you once again pushed me in the right direction. So to be fair, this light isn't exactly one of the original 3. The Anthro light was the winner but when I checked the dimensions of it, realized it was 52" long. That is huge. Like cathedral ceilings huge. Like bigger than the table huge.


So I scaled back and went with the medium sized option. So, so happy with the choice! Isn't it awesome!


I'm loving it all right now, it feels like a defined space, but still looks cohesive with the living room. 


I'm also okay with the ultimate choice to leave the light centered where it was. The amazing Craigslist marble sideboard find made shifting the room a little to the right a no brainer. 


And what post would be complete with out a photo bomb from a corg? 

Happy 2015!
Betsy

Tuesday, December 9, 2014

Cleaning up the deck

The porch corner is up! The contractor dude came out, car jacked the corner up, dug some holes, poured new footings and set er' back down. So. much. better.


I mean seriously every time we had a bad storm I was afraid the porch was going to rip away from the house or sink into the ground! Now everything is nice and sound.


Getting this done of course prompted me into a whirlwind of porch remodeling!


I ripped the old sagging screening off (in the rain, because I'm a weirdo and get bored?) and scrubbed the deck and porch boards.


This product works really nicely, but I did have to clean a second time using a deck cleaning brush and some serious elbow grease.


This was after the first pass of just washing, no scrubbing. I wish I had a total before picture because even this was an improvement. 


And a few days later  is after another rain storm and the second round of cleaning, but it is way better. Looks even nicer when it dries out. The boards that where mildewy and black on the right, now look almost brand new!


So after all that I was left with a deck/porch that the corgis love, but I've still got big dreams for. See those RED vertical porch beams. Going Going Gone!


Porch furniture had to briefly go back out for Thanksgiving, but I'm glad all the prep work is done so I can get on with the fun stuff.

Get excited!
Betsy


Tuesday, December 2, 2014

Terrarium

This has been on my to do list for a while now and I'm so happy with the results.


First let me say that I am not and will never be a huge fan of faux flowers/plants. But I've got to admit I'm really good at killing real plants and Hobby Lobby has some really great options. {They're faux ranunculus are pretty darn fantastic}


So with the empty Ikea terrarium I purchased over a year ago I decided to give faux terrarium making a go.  Its the white square looking thing in the far right corner. {Bear!}


First I did a massive Hobby Lobby run to gather all my supplies. Michaels has some faux florals, but  they are not up to par.


Not so bad looking, eh?


So for my first attempt I just threw the rocks in. I really like the look of layered ground cover and I though the rocks and moss would be enough.


They weren't. I place a few plants in there and it just looked dumb.


So out to the garage I went and dumped some potting soil in.


Add the river rocks on top and things are already muuuuch better.


Then I just started placing plants.


The soil and rocks did a perfect job of holding the succlents where I wanted.


I got everything all layered up and added my moss. So happy!


Even better was that I ended up only using 1/3 of what I bought. This wasn't the cheapest terrarium to make and probably would cost about the price a live one. However, I won't be replacing plants in this puppy!


I mean really! It looks so good. I don't think you would know they were faux unless I told you, or you happen to read this blog.


So back up on the shelf they went. I've got to learn to photograph in the den a little better. The glare is ridiculous!

See ya'll soon!
Betsy